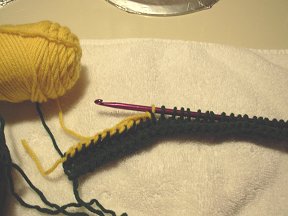
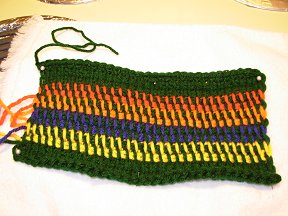
Overall view of the first color change
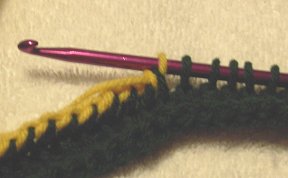
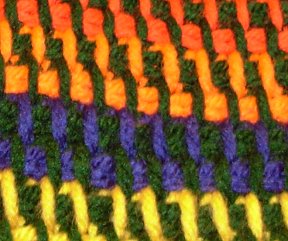
Closeup view of color change.
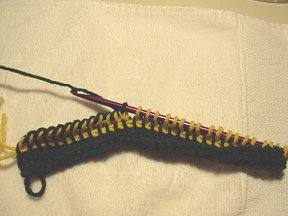
The change back to Color 1.
Uh, well, a close up of changing back to Color 1.
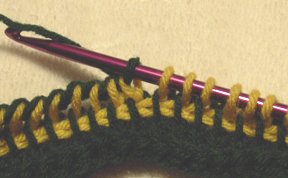
Side 1, complete.
Quelle surprise! ĹTis a close up of Side 1!
I created this simple case for the Ravelry Darfur groupĺs Sudan Project, but I canĺt say I think Iĺm the only person ever to make a pouch this wayů. LOL! Anyway, please feel free to sell or donate whatever you make using this idea! I chose the afghan stitch because the resulting fabric is firm and has almost no gaps; I chose the colors I did because, well, I like Ĺem. So there.
Materials
Yarn, or string, or fishing line, or bailer twine, or whatever you want to use
Afghan (aka Tunisian) crochet hook
Zipper to fit completed pouch
My original uses:
Red Heart Hunter Green (Color 1)
Caron Natura Lemon (Color 2)
I Love This Yarn Royal (Color 3)
Red Heart Vibrant Orange (Color 4)
K-Mart Sayelle Devil Red (Color 5) (yes, the depths of my stash yielded this relic of yesteryear! Iĺm not much for red so I just donĺt buy it -- this was given me!)
Using plain old Red Heart, and a Boye brand size I (5.5mm) afghan hook, I chained 30.
Then, I worked in basic afghan stitch across -- 29 stitches. This gave me a piece about 8.5" wide. I crochet loosely, so if you crochet tightly, you might want to start with 35-40 for your base chain.
From here, youĺve got options. You can work the whole piece in one color. You can work one side in one color, and the other side in another color. Or, you can go a bit haywire, as I did....
I worked two full rows of afghan stitch, then on Row 3, I "loaded" the hook with my beginning color, then switched to Color 2 to complete the rowĺs stitches. I did not cut the yarn for Color 1, as I intended to pick it up again very soon!
For Row 4, I "loaded" the hook with Color 2, then switched back to Color 1 to finish the row. Here, I did cut Color 2; its work is done for now. However, you may not be quite so haywire: if you want to alternate between the first two colors, go for it! Then, you donĺt have to cut Color 2.... Important safety tip, Egon: I worked the tail of my base chain up along the edge, then used it to tie off the first tail of Color 2. The second tail dangled helplessly until Row 5, when I again had a tail to tie off. And believe me, you want to tie those things off as soon as you can, or that edge gets all wonky and loose. Just thought youĺd like to know!
For Row 5, I "loaded" the hook with Color 1, then picked up Color 3 to finish the row.
Row 6 repeated Row 4, using Color 3, then back to good old reliable Color 1.
Row 7 repeated Row 5, picking up Color 4 to finish the row.
Row 8 repeated Row 6.
At this point I "loaded" the hook with Color 1, then measured the piece: including the row on the hook, the piece was 3" tall. I was shooting for about 4" tall. On to Color 5!
Row 9: I finished the "loaded" hookĺs stitches with Color 5.
Row 10 repeated Row 8.
Rows 11 & 12, I worked in Color 1, then measured the piece. Huzzah! A smidge over 4", which meant that when I completed the row of SC to finish, it would be about my target height.
Row 13: the obligatory row of SC, worked into the loops from Row 12. Please refer back to the afghan stitch instructions if you need help figuring it out! After securing the end, I snipped Color 1, leaving an 8" tail for stitching the sides together.
Nowů. The fun part! Side 2!
Oh, donĺt take on so. You knew there had to be a Side 2. Otherwise, how would it actually hold the pencils?
I went back to my base chain. With the right side facing me, using the unworked loops, I "loaded" my hook with Color 1. Then, I repeated all the rows I did for Side 1. Voila! The only real difference: I had no convenient starting tail to tie off the colors, so, I ran Color 1 up between the two tails of each individual color, then tied the two tails off together.
To finish the case, I turned to the back, worked in all the ends, then with right sides facing, stitched the sides. I still need to get a zipper, but Iĺll do that tomorrow.... I wanted to get this up tonight!
|
Overall view of the first color change |
Closeup view of color change. |
|
|
The change back to Color 1. |
Uh, well, a close up of changing back to Color 1. |
|
|
Side 1, complete. |
Quelle surprise! ĹTis a close up of Side 1! |
Okay, here are two of the finished product, in the Fiesta and Zebra variations!
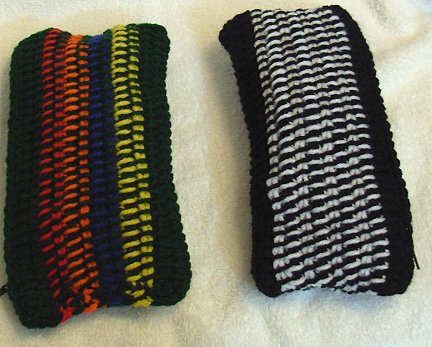
Fiesta and Zebra, side by side. Slightly stuffed with socks, just like a teenager's bra.... |
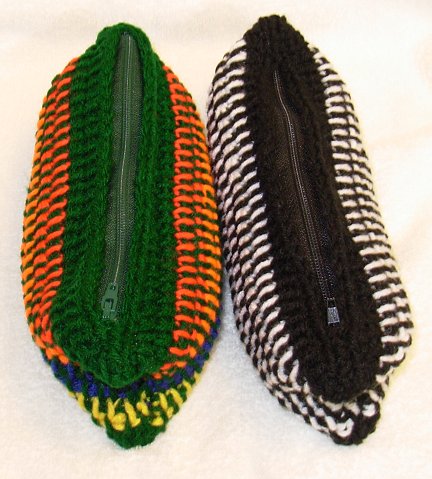
A view from above, to show the zippers. Don't know why. Just seemed necessary. |


Last updated: 16 January 2009. Page copyright 2009.